Tree and Shrub Planting
Generally we plant trees and shrubs in the areas where we have previously removed unwanted, invasive species. By replacing exotic plants with native shrubs and trees, we help limit the chance of their return while restoring a variety of plants that may have likely been there in the first place.
As a volunteer, you will not be expected to know everything about planting. There will be FMR and other staff at planting events to help walk you through each step. However, if you would like an overview of the planting techniques, they are below.

These trees are ready to be planted.
Container-grown plants
Plants started in containers are successfully planted by following these steps.
1) Dig a hole about twice as wide as the plant's container and a few inches shallower. Roughen or loosen the soil on the bottom and sides of the hole for easier root penetration.
2) Remove the plant from its container. This should be done gently by placing the plant on its side and hitting the sides of the container to loosen the soil and roots along inside. (The container end should be held over the prepared hole.) Trim any roots that are significantly longer than most others before placing the root-ball into the hole.
3) Place the plant in the hole at the same soil level as the surrounding surface and fill in the empty width with soil.
4) Pack the down the soil lightly to reduce air pockets. Water liberally.
For further information on stem girdled roots, visit this PDF
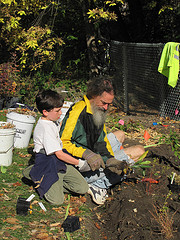
Everyone can help with planting.
Bare-root plants
Tree and shrub planting is most successful when following these four steps. As always, FMR and other staff will be on-hand to guide you through the process.
1) If available, use a tree-planting bar to quickly and easily create a slit in the soil that will accommodate the roots of the plants. You may need to make several insertions of the bar to make an adequate hole. If you don't have a tree bar, you can use a shovel instead.
2) Place the plant roots into the slot created. Stop and evaluate at this point if the hole is deep enough and wide enough. Look for the "root flare" at the base of the stem. The proper depth for the plant is just below where it starts to flare. Once installed, only the very top of the root flare should be visible. Avoid cramming the roots into the hole, but a little pressure is fine. Make sure there are no roots sticking above the ground.
3) If you use a tree bar, you won't actually remove any soil, so to close up the planting hole, simply step on the earth to close it, if the hole is small. Another way to close the hole is to insert the tree bar a few inches away from the hole and then leverage the soil back toward the plant. Stomp on the soil next to the plant to make sure there are no air holes.
4) Water liberally with at least a gallon of water.
Volunteers plant a variety of species.